How to Enable SAML from the UI Portal
The following steps are for the Account Administrator to complete when logged in to the UI Portal.
-
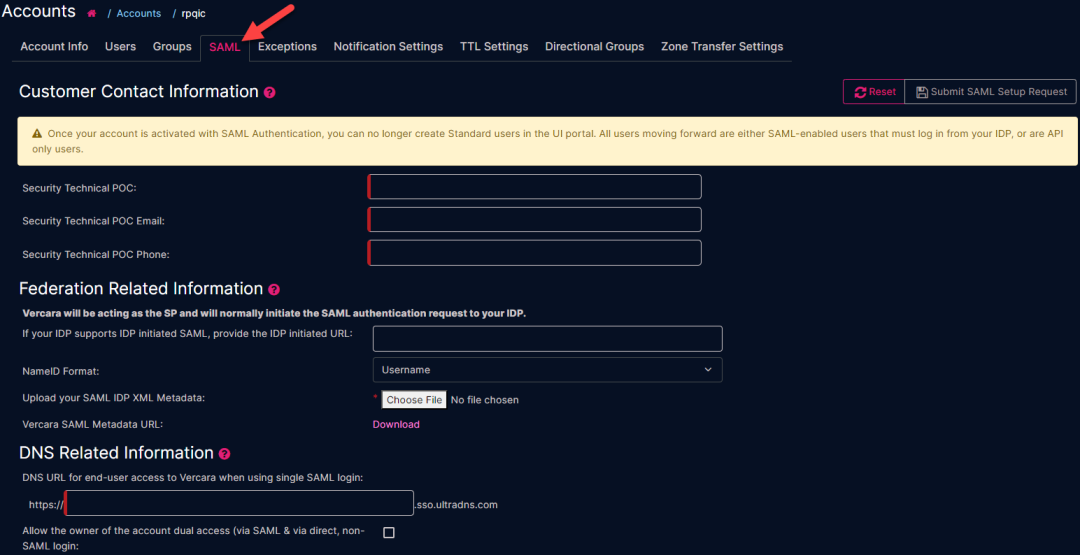
Click on Accounts from the left-hand navigation pane.
-
Select the Account Name that you want to enable SAML for.
-
Click the SAML link from the header.
-
Complete the required fields (indicated by a red bar in the field). Download the sample XML metadata file so that you can copy the format correctly.
-
Click Submit SAML Setup Request when finished.
|
|
Account Owners and Admins, please note the following disclaimer before submitting your SAML request.
Once SAML is enabled on your UltraDNS account, Creating New Users will only create API Only users. If new users need to access the UltraDNS Portal, theyneed to be created from your IDP. |

Required SAML Details
Below you can find each of the sections that are required to be completed before you can submit your SAML request, with some additional description details and some best practice tips/configuration recommendations.
Customer Contact Information
-
Security Technical Point of Contact (POC) – Provide the first and last name of the primary point of contact.
-
We highly recommend providing the contact details for an individual familiar with your Identity Provider (IDP) and SSO setup, as they will be the individual that Customer Support will reach out to if there are any issues during the SAML submission process.
-
-
Security Technical POC Email – Provide a valid email address (in the addr-spec format) for your IDM team's Point of Contact email address. (i.e. John@email.com)
-
Security Technical POC Phone – Provide a valid phone number (without dashes) beginning with the country code for the primary point of contact.
Federation Related Information
-
IDP Initiated URL – Optional. We will be acting as the Service Provider (SP) and will initiate the SAML authentication request to your IDP. If however, your IDP supports the initiation of SAML authentication requests, then please provide the URL in the designated field.
-
NameID Format – Select either Username or Email. Contact your IDM team for details.
-
If your IDP sends the user’s email address (Eg. john.doe@abc.com) in a NameID format in SAML Responses, select Email.
-
If your IDP sends the user’s username (Eg. jdoe) in a NameID format in SAML Responses, select Username.
-
-
Upload your SAML IDP XML Metadata – Click the Choose File button and upload your XML Metadata file.
-
Click Download to get the UltraDNS XML Metadata to match the configuration requirements before submitting your own XML Metadata file.
-
Vanity URL
-
UltraDNS likes to provide a vanity URL that your users can bookmark and log in from using SAML SSO. Once set up, clicking this URL will take your users to your IDP Login page. This is not the ACS URL.
-
Allow the owner of the account dual access – If you (as the Admin) need to retain access to the UI Portal as well as access via SAML (SSO), check the box for dual access.
-
If you opt not to check the box, you (and all other account logins, including the account owner) will NO longer be able to log in directly to the UltraDNS Managed Services Portal.
-
Submitting Your SAML Request
Verify that all of the information you have provided in the previous sections is accurate before clicking the Submit SAML Setup Request button.
|
|
Note: Once you click the Submit button, changes to your Primary Point of Contact, Federation Related information, and/or DNS Related Information cannot be changed. Please ensure that your information is accurate before submitting, otherwise, you will need to reach out to Support for further assistance. |
Upon the successful completion of your SAML request, a confirmation email will be sent to the Customer Security Technical POC Email that you provided. This email will contain the URL (vanity URL) you will use to access the UI portal moving forward.
Please wait a few minutes before trying to log in using the vanity URL that has been emailed to you. While you wait for the email confirmation, please continue through this guide for the final steps of setup.
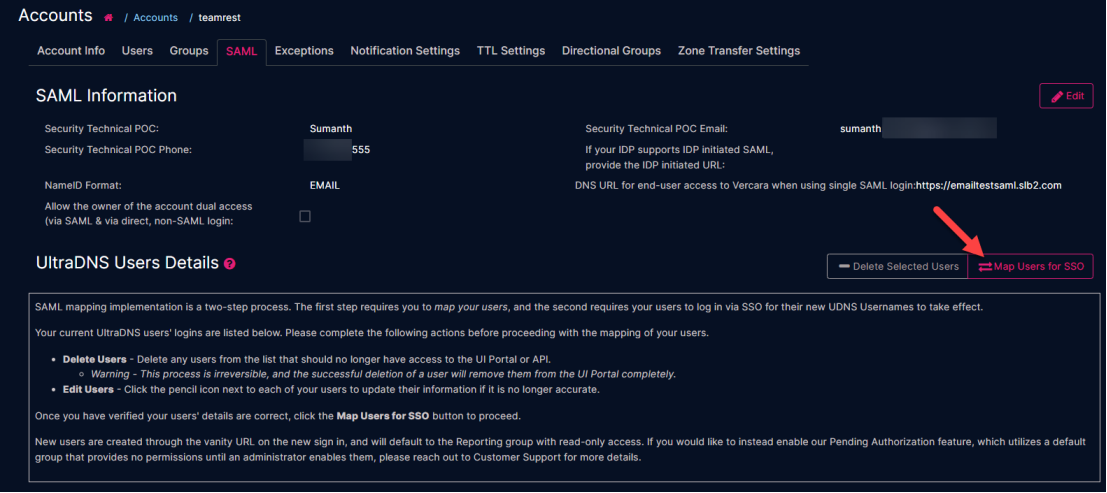
After your submission has been processed, the UltraDNS Users Details section will appear with the list of your users currently found on the UltraDNS UI Portal. Your users’ details will be displayed in one of two different formats, which is determined by the NameID Format type that you selected.
IDP Provisioning
As previously stated, once the request for SAML has been submitted, our Customer Support team will send an email to the Primary Point of Contact that was listed. This email contains the following information to assist with the provisioning of the UltraDNS setup from within your IDP.
"Please proceed with provisioning of your setup information within your IDP using the SAML XML Metadata available at the URL:

https://amsso.ultradns.com/neusso/saml2/jsp/exportmetadata.jsp?entityid=nss-sp-hosted&realm=/NSSRealm

When setting up your system, please ensure that the NameID and SAML attributes match the assertion as specified below.
NameID and NameID Format
If your IDP sends user’s user name in NameID in SAML Response, the NameIDFormat must be unspecified as shown below:
urn:oasis:names:tc:SAML:1.1:nameid-format:unspecified
If your IDP sends user’s email address in NameID in SAML Response, the NameIDFormat must be emailAddress as shown below:
urn:oasis:names:tc:SAML:1.1:nameid-format:emailAddress
UltraDNS requires three user attributes in the SAML Response. Please make sure to send the following attributes in the "AttributeStatement" section of the SAML Response:
|
givenname |
User's Given / First Name |
<saml2:Attribute Name="givenname" NameFormat="urn:oasis:names:tc:SAML:2.0:attrname-format:basic"> <saml2:AttributeValue xmlns:xsi="http://www.w3.org/2001/XMLSchema-instance" xsi:type="xs:string">John</saml2:AttributeValue> </saml2:Attribute> |
|
sn |
User's Surname / Last Name |
<saml2:Attribute Name="sn" NameFormat="urn:oasis:names:tc:SAML:2.0:attrname-format:basic"> <saml2:AttributeValue xmlns:xsi="http://www.w3.org/2001/XMLSchema-instance" xsi:type="xs:string">Doe</saml2:AttributeValue> </saml2:Attribute> |
|
|
User's Email ID / Email Address |
<saml2:Attribute Name="mail" NameFormat="urn:oasis:names:tc:SAML:2.0:attrname-format:basic"> <saml2:AttributeValue xmlns:xsi="http://www.w3.org/2001/XMLSchema-instance" xsi:type="xs:string">john.doe@abc.com</saml2:AttributeValue> </saml2:Attribute> |
The above-listed formats are MANDATORY.
Upon full implementation of SAML / SSO with UltraDNS, your existing UltraDNS login ids will be renamed to the persistent NameID value passed to UltraDNS, and direct login access via the UltraDNS portal https://portal.ultradns.com/ will be blocked. Any logins used to access REST API will continue to be supported as is.”
UltraDNS Users Details
The UltraDNS Users Details section displays the SAML features for your users based upon existing UI Portal details, and the NameID Format field type that you selected during the initial SAML setup request.
The significant difference is the addition of the SSO Login column for NameID Format Username (Non-Email) selection.
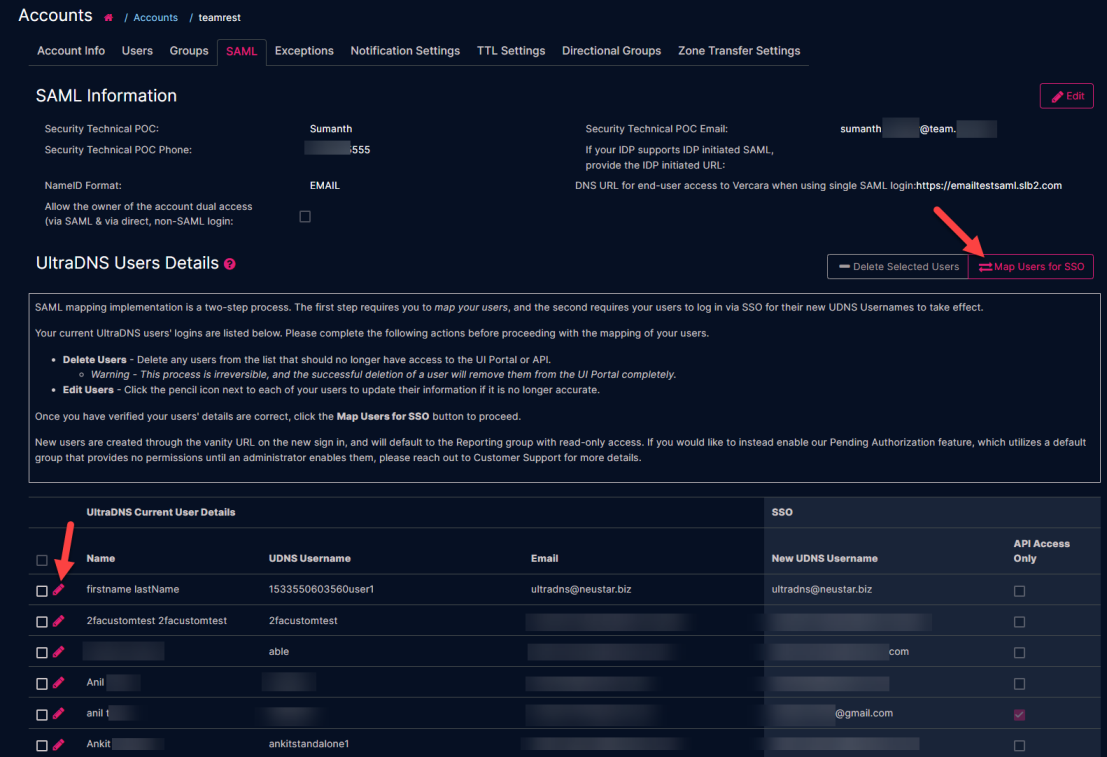
The following table denotes each column from the UltraDNS User Details section, along with an additional explanation of each field, and what content (if any) needs to be updated or provided.
UltraDNS User's Details by NameID Format
|
Column Header |
Details |
Additional Actions Required? |
|---|---|---|
| Name | The first and last name of the user taken from the My Profile section of user’s UI Portal account. | None |
|
Current UDNS Login |
The current username used by the user to access the UI Portal. |
None |
|
|
The current email address taken from the My Profile section of the user’s UI Portal account. Click the pencil icon to update the email address if it is invalid. |
Yes. Update if invalid. This will become part of the SSO Login if the NameID Format Email was selected. |
|
SSO Login |
**Only present when NameID Format is Username (non-email).** Click the pencil icon to update the SSO Login for the user, so that it is aligned with your current SSO username format. |
Yes. Update if invalid. This will become part of the SSO Login if the NameID Format Email was selected. |
|
Upon Implementation UDNS Username |
Displays what the new username will be after successfully logging in via SSO. When NameID Format is Email:
When NameID Format is Username (non-email):
|
Yes. Update if invalid. Only available when NameID Format is Username. |
|
API Access Only |
If selected, the associated user will ONLY have access to the REST API. The user will retain all of their current API permissions. However, the selected user will no longer be able to access the UI Portal directly, or via SSO login. |
Yes. Selected when editing user details. |
|
|
If you forget to check the box for API Access Only, and you have already selected the Map Users for SSO button, your selected user will lose the ability to log in to the API if they use the vanity URL. However, if the user never logs in using the vanity URL, they can continue to access the REST API and retain their access and permissions. |

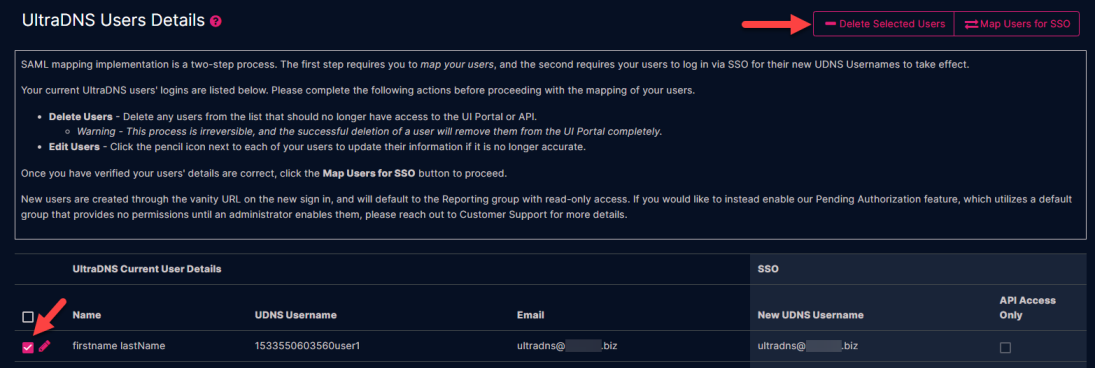
Delete Users
The Delete Selected Users option provides the ability to clean up your list of UltraDNS Users. For those users that should not have access to the Ul Portal (or API), or are no longer affiliated with your company, it is the Account Owner’s responsibility to delete these users.
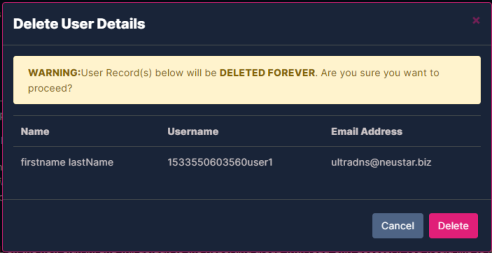
Click the checkbox next to each of the users that should be deleted, and click the Delete Selected Users button. A confirmation window will appear displaying the selected user(s) for deletion. Click the Delete button to confirm their deletion from the system.
|
|
WARNING - Deleting a user is irreversible. Please be sure you confirm that the user does in fact need to be deleted before completing the action. |

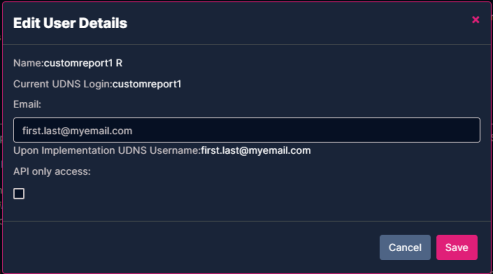
Edit Users
We highly encourage you to review and update your users’ details before continuing with the mapping process. Click the icon to edit each user.
For SAML requests that were submitted with the NameID Format type as Email, you can:
-
Edit the user’s Email address.
-
Only unique email addresses are allowed. If duplicate email addresses are detected, an error will occur and the SAML Mapping process will be canceled.
-
The email address will directly update the Upon Implementation UDNS Username(the future SSO login credential) field for the user.
-
-
Check the box to determine if the selected user should ONLY have access to the API or not.
For SAML requests that were submitted with the NameID Format type as Username (Non_Email), you can:
-
Edit the user’s Email address.
-
Edit the SSO Login so it aligns with your current SSO login credentials.
-
The SSO Login field will directly update the Upon Implementation UDNS Username (the future SSO login credential) field for the user.
-
-
Check the box to determine if the selected user should ONLY have access to the API or not.
To further elaborate on why we highly recommend you update the email address for each user, below is an example of why your mapping may not correctly work.
Company ABC has the following listed under their Ultra DNS User Details section:
|
Name |
Current UDNS Login |
|
Upon Implementation UDNS Username |
|
John Dykes |
John235 |
John.d235@gmail.com |
John.d235@gmail.com |
However, this user's credentials in their customer IDP are John.Dykes, or John.Dykes@abc.com
If John is mapped as is, the mapping will complete with an error when John tries to log in via SSO, because his credentials will not be recognized by his IDP. If his email address is updated however to John.Dykes@abc.com, then the mapping will complete without error, and John will be able to log in via SSO without any issue.
Map Users for SSO
Once you have verified that all your users’ information is accurate, click the Map Users for SSO button.
A confirmation screen will appear listing the total number of users that are being mapped for SAML, along with their details and login credentials.
Click the Confirm Map Users button to complete the SAML setup process. Only click the Confirm Map Users button once, as doing so multiple times could cause issues with your submission.
When the confirmation for the SAML submission appears, your request will be processed. At this point, you can log in using the SAML credentials and vanity URL that were emailed to you.
The SAML process will work around a trial period. Once you have become familiar with and comfortable using the SAML login process to access the UI Portal and manage your users, UltraDNS will remove all of your user’s direct access to the UltraDNS Portal.
Our Customer Support team will reach out to you directly to confirm your readiness to begin using SAML and have your access to the Portal removed. For further assistance on the SAML submission process, or with using SAML, you can open a support ticket at https://dns.ultraproducts.support.
User Access and Permissions
For existing users on the UltraDNS Portal, your permissions will remain once your Account Administrator completes the Setup Users for SSO step (before you attempt to log in using the vanity URL).
If the Setup Users for SSO step has not been completed, and you log in using the vanity URL, your account will inherit the Reporter Role permissions upon logging in. The Reporter Role provides only Read Access. Your Account Administrator will need to log in and change your permissions from the UltraDNS Portal.
| Configured Account Level Allowed IP (ranges) for your account do not currently apply to SAML users, as the IP authentication check is done by the Identity Provider (IDP), not UltraDNS. |
Creating New Users
Once the SAML setup is completed, new users are dynamically provisioned from your end. Once you have established a new user’s credentials, they are automatically enabled for SAML and have the Reporter Role access, which gives them Read Only access. You can change their access if necessary through the UI.
The Invite User feature is only for granting API access to a user.
Pending Authorization
For an additional security measure for your account, contact Customer Support and request to have Pending Authorization enabled on your account. With this optional feature enabled, any newly created users will be placed into a default Pending Authorization security group, where the user does not have any permissions to access the Managed Services Portal until an account administrator moves them to a designated security group.