Directional
Directional DNS provides origin-based routing and the ability to optimize the traffic flow of different types of DNS requests based on the location or source IP address of the site visitor. Traffic can be directed to different servers, data centers or content and service providers, speeding responses, optimizing resource utilization, or providing custom content.
Directional DNS identifies where a site visitor is geographically located or the origin of their IP address (or both) and allows you to provide a specific route to a specific resource. In simple terms, the New York website visitor with a specified IP address will go to the New York data center rather than the data center located in Amsterdam. This allows you to optimize regional routing; serve regional or consumer specific applications or content; control access to local service providers; and so on.
By combining Directional DNS with SiteBacker or Traffic Controller, you can build powerful cloud-based solutions to control traffic flow patterns, optimize network performance, ensure access availability and maximize profitability by fully utilizing existing resources.
Configuration Rules
-
Create any Resource Distribution/SiteBacker/Traffic Controller pools first if you plan to route traffic for a region or group of regions to the RD/SB/TC pools.
-
Directional pools on the zone apex (for example, the example.com zone) cannot contain CNAME records.
-
Combinations of A and CNAME records or AAAA and CNAME records are allowed in the same pool.
-
The record type No Response is available for all pools, but other record types may only exist in their own pool. The No Response record blocks traffic from specified regions by returning No Error, No Response.
There are three types of possible Directional pools:
-
Geolocation & Source IP – Responses are based upon a user's geographic location and IP address.
-
Geolocation – Responses are based upon a user's geographic location.
-
Source IP – Responses are based upon a user's IP address.
Create a Directional Pool
-
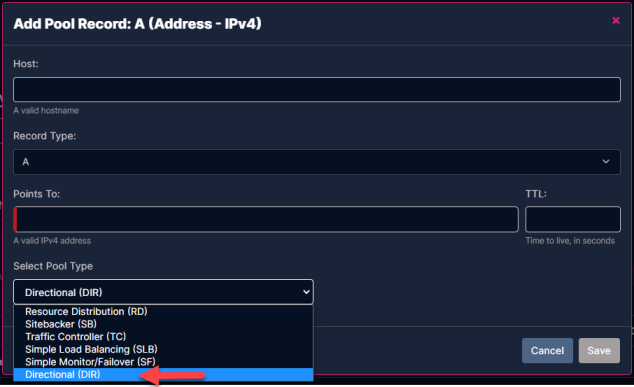
Select either an A or AAAA record type, and then click the +Add Pool button.
-
Select Directional (DIR) from the Select Pool Type drop-down menu.
-
Provide the Host and the Points To fields.
-
Optionally you can provide the TTL value.
-
Click Save when finished.
Conflict Resolves To
If your Directional Pool contains both Geolocation and SourceIP records, then an additional drop-down menu will appear when you view/edit your pool. When there is a conflict between a matching Geolocation group and a matching Source IP group, the selected type takes precedence.
Select a record type from the drop-down list, and then click the Save Changes button. Your selection can be changed at any time, and as often as you need.
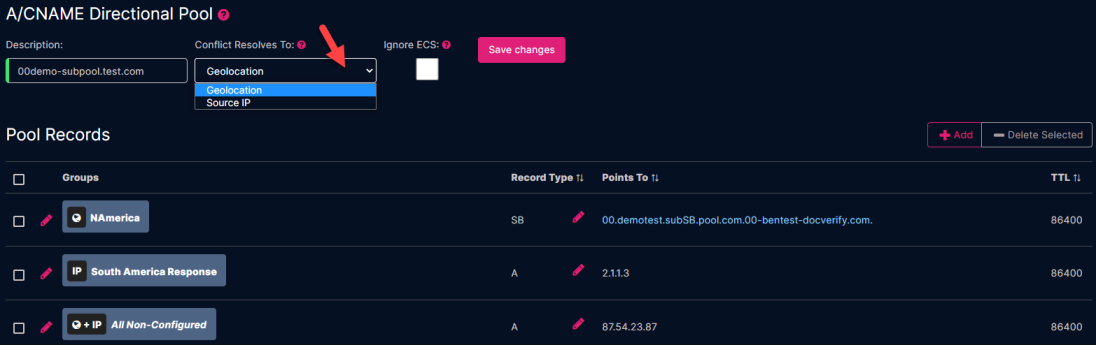
Ignore ECS
Enabling the Ignore ECS option determines whether or not to ignore the EDNS0 (which is an extended label type allowing for greater DNS message size) Client Subnet data when available in the DNS request. We recommend that if you are not familiar with this concept, do not check the box to enable this feature.
All Non-Configured Record
After the initial creation of a Directional Pool, a default All Non-Configured record will appear. All-Non Configured implies that every geographic region is associated to the record, as well as any pre-configured SourceIP details, until you configure these details in a new record.
The All-Non Configured record can be deleted at any time, but it is recommended you leave it until you begin to configure the Directional Pool with additional Geolocation / SourceIP records.
Edit a Directional Pool
After you have created a Directional Pool, you will see the Pool Records screen. From here, you can add additional records and customize whether you want them to contain Geolocation data, SourceIP details, or a combination of both.
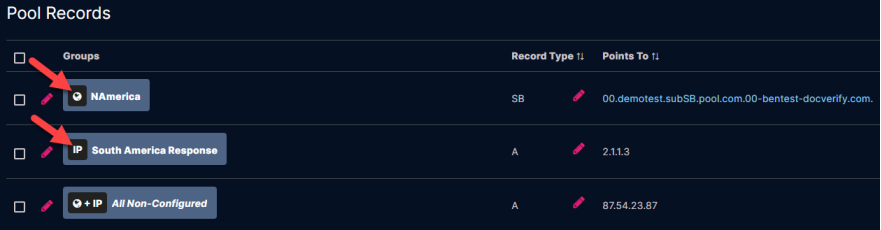
From the Pool Records screen, you can see the currently associated records, along with the Groups assigned to them. You can click on
-
The “globe” or “earth” icon denotes that the record contains Geolocation data.
-
The “IP” icon denotes that SourceIP details are associated to the record.
-
To edit either of these fields, click on the icon itself to open the details.
-
Add a Record – Geolocation
Adding Geolocation details to you record works in a "drill-down" manner, meaning that you can select specific states and provinces from a within a selected territory, or select an entire overarching region (continent) instead. There is no limit to the number of regions / territories / states that can be associated to your record.
To add a new record that contains Geolocation data:
-
Click the +Add button.
-
Select a Record Type from the drop-down menu.
-
A record
-
CNAMErecord
-
No Response
-
-
Provide the IPv4 address for the record in the Points To field.
-
Optionally, you can add the TTL value.
-
-
Click Add a Group when finished.
-
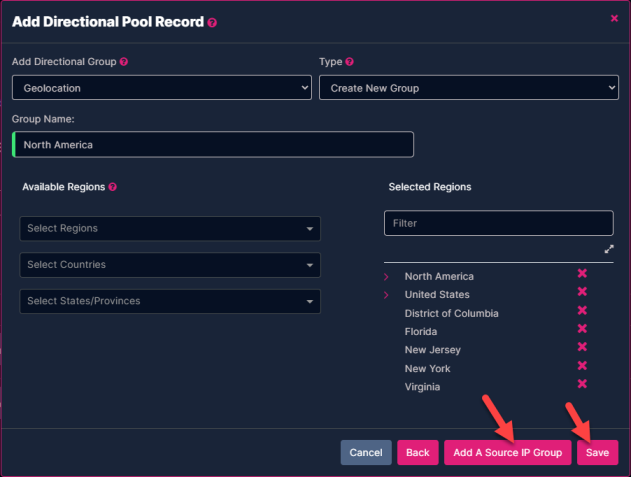
Select the Geolocation from the Add Directional Group drop-down menu.
-
Select Create New Group to associate new Geolocation details to the record, or, select Assign Global Group to associate a pre-configured Directional to your record.
-
If you opt to use an existing Global Directional Group, select the Group Name from the drop-down list of Global Groups you have access to.
-
-
Provide a Group Name for your record.
-
Click in the Select Regions field to select any applicable regions for your record.
-
In the following example, we selected North America.
-
-
Once you’ve selected your region(s), click outside of the Available Regions field.
-
If you click on the arrow at this point, you will select the region and by default, every country and state / province as well.
-

-
Click in the Select Countries field, and select any applicable territories for your record.
-
If you click on the arrow at this point, you will select the country / countries and by default, every associated state / province
-
-
Click in the Select States/Provinces field, and select any applicable states or provinces for your record. Once you have made your selections, click the arrow to move your selections to the Selected Regions column.
-
To remove a selected location, click the X next to the location name.
-
-
Once you have made all of your selections, click Save to complete the record, or click Add Another Group to associate SourceIP data to the record as well.
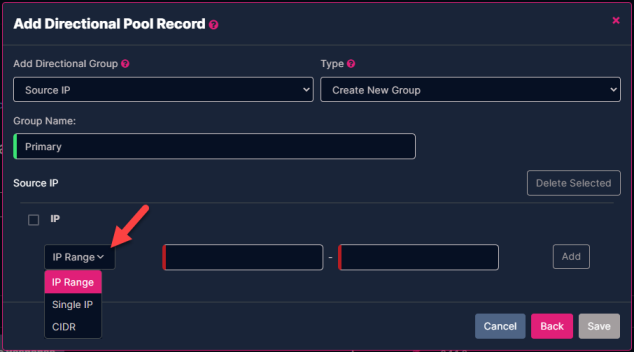
Add a Record – SourceIP
A Source IP Directional Pool tailors a response based on your IP address (either IPv4 or IPv6). The UI portal supports standard IPv6 address notation: eight groups of four hexadecimal digits, separated by a colon (:). You can simplify the notation by omitting leading zeros in a group, or by replacing one or any number of consecutive groups of 0 with two colons (::). For example, these IPv6 addresses are equivalent:
3FFE:0B80:0447:0001:0000:0000:0000:0001
3FFE:0B80:0447:1:0:0:0:1
3FFE:0B80:0447:1::1
To add a new record that contains SourceIP data:
-
Click the +Add button.
-
Select a Record Type from the drop-down menu.
-
A record
-
CNAME record
-
No Response
-
-
Provide the IPv4 address for the record in the Points To field.
-
Optionally, you can add the TTL value.
-
-
Click Add a Group when finished.
-
Select the SourceIP from the Add Directional Group drop-down menu.
-
Select Create New Group to associate new SourceIP details to the record, or, select Assign Global Group to associate a pre-configured Directional to your record.
-
If you opt to use an existing Global Directional Group, select the Group Name from the drop-down list of Global Groups you have access to.
-
-
Provide a Group Name for your record.
-
Select the SourceIP Type in which you will provide your IP address details.
-
IP Range – Provide a beginning and ending IP address to create a range.
-
Single IP– Provide a single IP address for the record.
-
CIDR – Specify the network and routing prefix. For example, 192.168.0.0/16 or 2001::/64.
-
Note: The UI Portal automatically converts the CIDR notation to an IP range.
-
-
-
Once you have selected your input type, provide your Source IP details, and then click the Addbutton.
-
You can add as many IP address as you wish. Click Save when you are done, or, click Add Another Group if you want to associate Geolocation data to the record.
Overlaps
You CANNOT overlap regions or Source IP ranges at the record pool level. However, Global Directional Groups (both Geolocation and Source IP) may overlap. For example, you could have a North America group consisting of Canada, the United States, and Mexico, and three groups consisting of Canada, the United States, and Mexico separately; or you may have overlapping networks.
Converting a Mixed Pool to a Geolocation or Source IP Pool
Carefully consider before converting a Mixed Pool (a pool that contains BOTH Geolocation and Source IP Groups and records) to a Geolocation or Source IP Pool (pools that contain ONLY Geolocation or Source IP Groups and records. Once you click Convert, the Groups and Records that do not match the pool type will be removed.
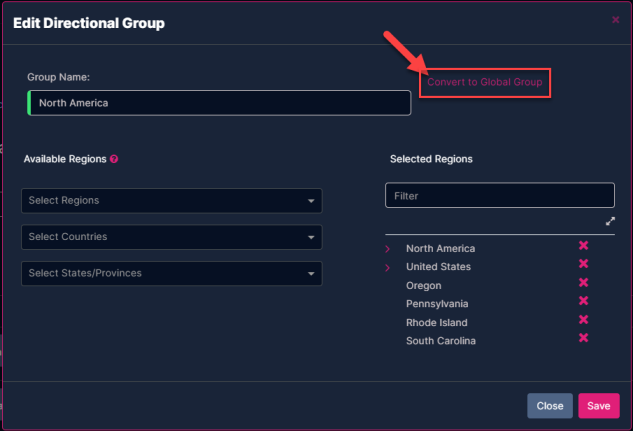
Convert to Global Group
Once you have successfully created a record containing either SourceIP data or Geolocation details, you can convert your saved settings to a Global Directional Group.
-
Click on the Globe or IP icon to edit the record.
-
Click the Convert to Global Group link.
-
Provide a new Global Group Name, and then click the checkmark icon.
Directional Groups
The Directional Global Groups section displays the directional group templates (at the account level) that you can use to create Directional Record pools in your domains. These configured groups can either contain SourceIP addresses, GeoLocation regions, or a combination of the two.
Using these (Account Level) Directional Groups can help simplify the creation process of your Directional Pools, by removing the need to assign multiple regions or IP ranges per pool (or record type) that you need to create. Once you’ve created and configured a Directional Group, you can add that group name directly to a record that is being created under your Directional Pool.
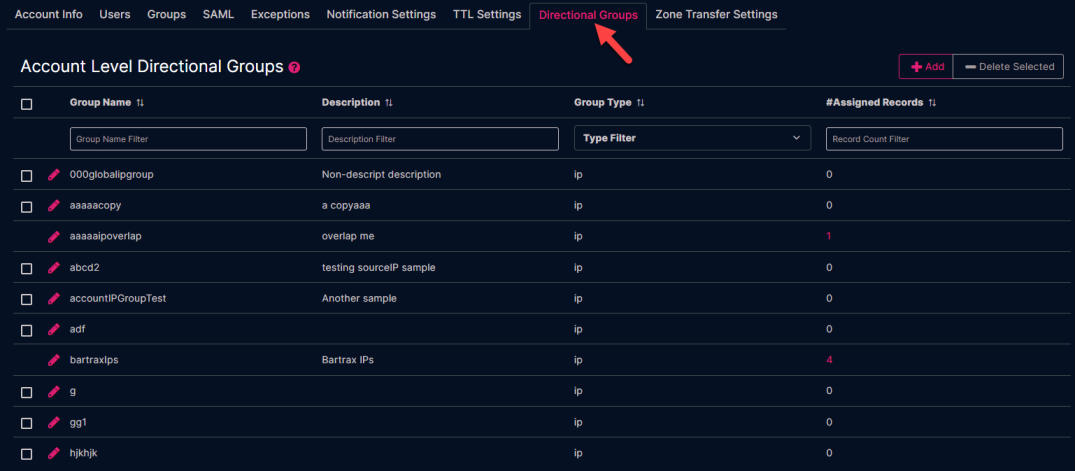
The Directional Groups landing page provides various sorting and filtering options while viewing your existing configured groups. You can click the up or down arrows to sort the list alphabetically, or use the filter option to perform a search for a matching filter type. All searches are performed as a wildcard, meaning any record matching a portion of your search will be displayed.
-
Group Name– Displays the Group name for the configured Directional groups.
-
Description – Displays the description (if any) provided for the directional group.
-
Group Type – Displays if the current Directional Group is configured for SourceIP (IP) addresses or GeoLocation (Geo) data.
-
#Assigned Records – Displays the current number of pools / records that are currently using the configured Directional Group. You can click on the number to retrieve a list of the associated pools.
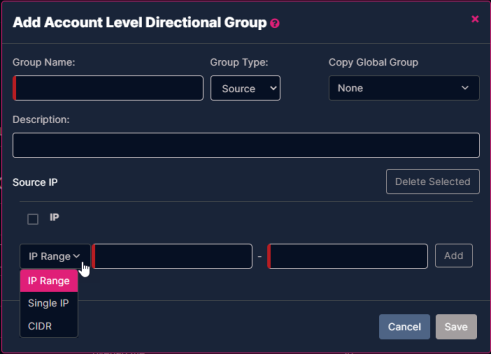
Add Directional Group - SourceIP
To create a new Directional Group that contains SourceIP details:
-
Click the +ADD button.
-
Provide the Group Name.
-
Select SourceIP from the Group Type drop-down menu.
-
If you have an existing SourceIP Global Group you can want to copy from, select it from the Copy Global Group drop-down menu.
-
(Optional) Provide a description for the Directional Group.
-
-
Select the IP Type from the drop-down menu.
-
IP Range – Provide the beginning and end IP addresses to create the range.
-
Single IP– Provide a single IP address.
-
CIDR – Provide the network and routing prefix values. For example, 192.168.0.0/16 or 2001::/64.
-
Note: The UI Portal automatically converts the CIDR notation to an IP range.
-
-
-
Click Add when you are finished to add the SourceIP details to the Group. You can add as many SourceIP records as needed.
-
Click Save when finished adding SourceIP records.
Add Directional Group – Geolocation
-
Click the +ADD button.
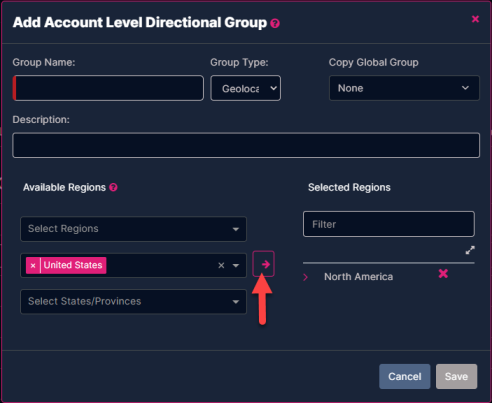
-
Provide the Group Name.
-
Select Geolocation from the Group Type drop-down menu.
-
If you have an existing Geolocation Global Group you can want to copy from, select it from the Copy Global Group drop-down menu.
-
(Optional) Provide a description for the Directional Group.
-
-
Select the Region(s) for the directional group from the Available Regions drop-down menu. Click outside of the selection box when finished making your selections.
-
To select an entire region, click the arrow to move the region and all of the associated countries and states/provinces to the Selected Regions section.
-
-
Select the associated Countries for the directional group (you can select as many as necessary). Click outside of the selection box when finished making your selections.
-
To select the entire country, click the arrow to move the country and all of the associated states/provinces to the Selected Regions section.
-
-
Select the available States/Provincesfor the directional group (you can select as many as necessary). Click outside of the selection box when finished making your selections.
-
Once you are done, click the arrow to move the selected locations to the Selected Regions column. Once done, you will see a hierarchical breakdown of your selections.
To clarify, if you select specific states/provinces, only those selections will move to the Selected Regions column, not the previous countries or region selections.