Configuring SiteBacker DNS
Completed
A SiteBacker (SB) pool is a grouping of A, AAAA, or CNAME records that monitors your servers and redirects traffic to a host standby in case of server failure. More simplistically, SiteBacker returns multiple IP addresses in an answer to ensure continual website access.
To create a SiteBacker pool, select Add Pool and specify the Host (ex: failover), Record Type (A), IP Address/Points To (1.1.1.1), TTL (300), and Pool Type (SiteBacker):
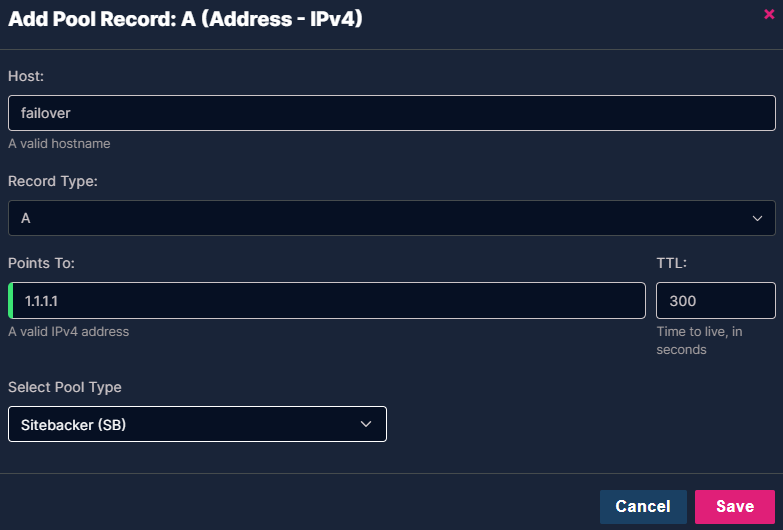
Clicking on Save will bring up the SiteBacker configuration UI:
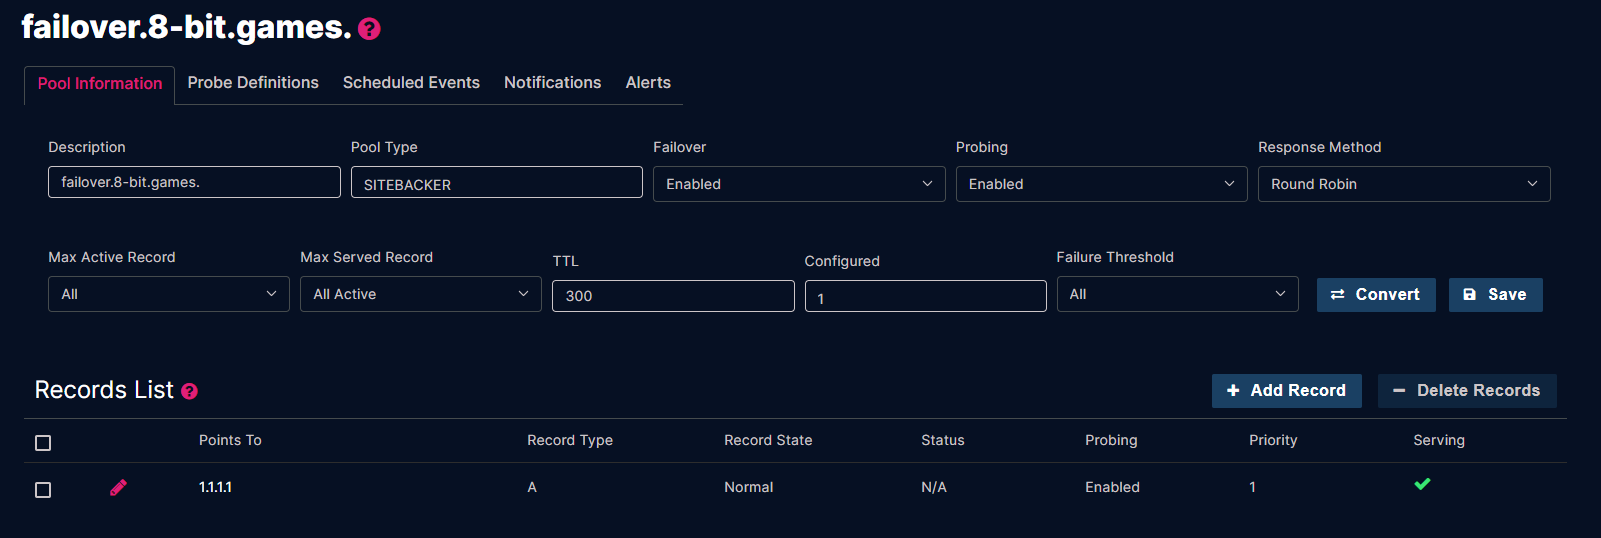
At this point the SiteBacker behaves no differently than a standard A/AAAA/CNAME record. There are a number of SiteBacker pool level configurations present on this screen:
- Failover - This determines if action (re: failover) should occur based on probing results (set to Enabled).
- Probing - Determines if active probing will occur for the pool (set to Enabled).
- Response Method - Determines the order that records will be returned in when there are more than one response (Round Robin, Fixed, Random).
- Max Active Records - Determines the maximum number of records that will be active in the pool (set to All).
- Max Served Records - Determines whether all active records will be served or just a subset (set to All Active).
- TTL - SiteBacker records should be paired with a low TTL to facilitate quick failover. Vercara recommends a TTL of 300 seconds at the most so that if a failover occurs, an old response to a failed server does not sit in recursive server caches for too long (preventing users from getting to the available server). It is important to note that low TTLs do increase the number of authoritative queries to the UltraDNS network.
- Failure Threshold - This controls how a pool is labeled. Set it to All to indicate that a pool will be labeled “Failed” when all records have failed.
To achieve failover we need to define additional pool records by selecting + Add Record:
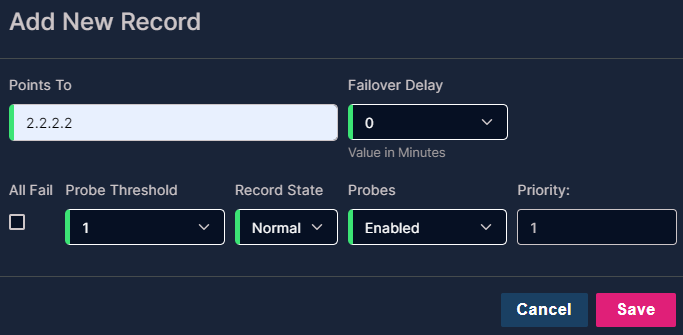
A quick sumary of these values:
- Points To - The IP address (or AAAA/CNAME if creating a pool for those record types) to add to the pool.
- Failover Delay - A delay (in minutes) for when to actually failover the record (almost always set to 0).
- All Fail - Used to specify that this is a record of last resort. It is not probed, not counted from a billing perspective, and is offered if there are no other viable options in the pool.
- Probe Threshold - For pools that have multiple probe checks you can specify the number of probes that must fail before considering the record to have failed (set to 1 in almost all cases).
- Record State - You can use this value to force a record into a fail state for testing (leave at Normal).
- Probes - Determines if the record should be probed (set to Enabled).
- Priority - You can specify different priorities to force a specific order in responses when multiple records are being returned in a DNS response (leave at 1).
For our purposes, check the All Fail box and click on Save. You should now have two records specified:

With the configuration as is a DNS query will return 1.1.1.1 only (see the green check under Serving) and 2.2.2.2 will only be served if our primary record fails. In order for that to happen we need to configure some probes. Click on the Probe Definitions tab and then click on + Add Probe:
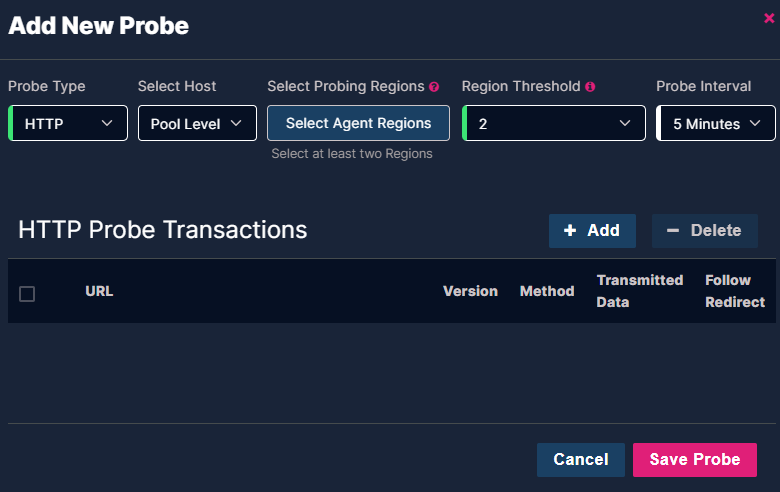
At a high-level, probe's require the following settings:
- Probe Type - Most common is HTTP to perform an HTTP POST or GET. Other options are Ping, TCP, FTP, SMTP, and DNS.
- Select Host - Probes can be run against all records in the pool (Pool Level) or individual records within a pool (set to Pool Level).
- Select Probing Regions - The UltraDNS probing network consists of 30 locations, in 8 regions. Select two or more regions (set to North America East and North America West).
- Region Threshold - Specifies how many regions must report failures before a probe is considered to have failed (set to 2).
- Probe Interval - How frequently the probe should be run. This value should be consistent with the TTL of the SiteBacker pool (set to 5 Minutes so that it's consistent with the 300 second TTL of the pool).
Now that you have the high-level settings, click on + Add to add an HTTP transaction. This is the action that is performed and evaluated every probing interval (minutes):
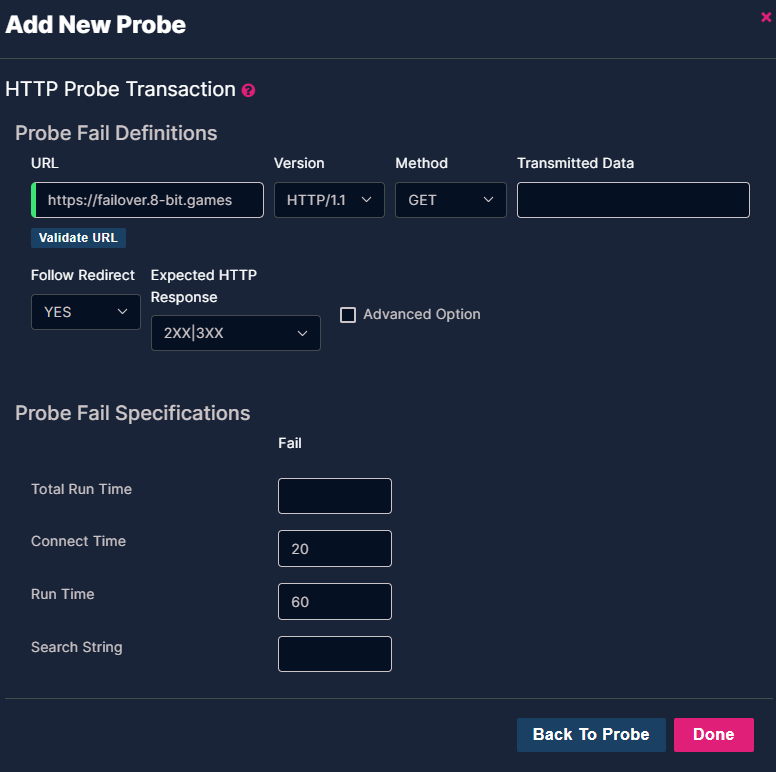 You specify the URL to test, aspects of the HTTP transaction (HTTP version/method, transmitted data, follow redirects, and expected HTTP response) as well as parameters of the test regarding performance (total run time, connect time, and run time) and availability (search string).
Probe configurations are discussed in detail in the Traffic Management User Guide (pages 14-25).